December 1, 2007
11 min. read
I searched without success for a lightweight, waterproof bag to protect my Martin Backpacker Guitar. Typical dry bags used for water sports are overbuilt for bicycle touring and backpacking use, where weight is a very large factor. They use clear vinyl or heavier vinyl coated cloth and weigh many pounds. This article describes the process I went through to make my own custom lightweight waterproof bags for touring and backpacking.
I ordered a set of front panniers and some lightweight waterproof bags to use in the panniers from Arkel. You can see the “roll over and snap” type closure of the dry bags I received. In these bags, I saw the perfect material to produce a travel guitar dry bag. I asked Arkel about getting a custom bag made, but they turned me down. Their supplier did not have the flexibility for a custom project. The design of these bags is dead simple, so I decided to just make one.
This page is my first attempt at making the bag and shows a large collection of what not to do if you attempt the same thing. Hopefully there are enough tips that you will be successful. You should be able to follow this page to make waterproof bags for any shape you want to, even simple squares. Although, If Arkel carried the size I wanted, I would probably just purchase it from them as the cost for materials and time to build a bag makes their prices really reasonable. Just remember to leave the biggest side open!
The Fabric
I had posted to the phred.org touring group (no long around) about waterproof bag material and was referred to The Rain Shed. They turned out to be a very helpful resource on harder to find fabrics for outdoor gear. I started with the huge sample set, knowing I would soon need additional material for the custom bicycle panniers I also had planned. I purchased a small amount of some 70 Denier Taffeta and 200 Denier Oxford Heat Seal Fabrics.
The 200 was almost exactly the same weight as my existing dry bags, and the 70 looked a little too light and would be puncture too easily. It is more like a very thin jacket lining that would have addition reinforcement. My bag would not have that luxury. I ordered 2 yards of the 200, some 3⁄4” plastic side release buckles, and some 3⁄4” flat nylon webbing. The dry bags from Arkel used 1” buckles, but 3⁄4” is sufficient, as there really isn’t any load on them and the smaller size allows for a tighter roll. Get the thinnest webbing you can find. Again, no force is really involved here and thinner webbing is easier to sew.
The Template
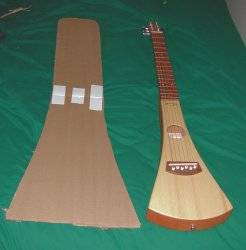
I taped together some cardboard pieces to create a template for the guitar. The template is around 2 inches larger than the guitar. This extra area is need for both the material to seal and the thickness of the guitar. This was just a guess on my part, but make sure to guess bigger than needed. It is easier to seal in further and cut off excess than to start over.
I used two small pieces of double stick tape to keep the template from shifting as I cut it. I would have produced a more even and cleaner cut if I used masking tape around the edges and cut through it. Just make sure when you cut the material that you don’t pull it. The more you let it lay without tension, the more accurate you can follow the template. Years later, I started woodworking and found out about carpet tape. This is a fiber backed extreme double stick tape. It is all I use for most projects, instead of the cheap foam tape shown in the pictures. You can find it at most big box stores, such as Lowes, Home Depot, etc.
The guitar looks just about right laying over the first side cut out. I set up for cutting the second side with my template same side up as it was in the last cut. DON’T DO IT THIS WAY! I was lucky that my template was fairly symmetrical, but I had to twist the bag at certain places to make the sides line up when sealing. If you flip it over when cutting the second side, they should like up perfectly. In other words, act like the template edge of the open side is a hinge when flipping the template.


If I did this again, I would make a half template and use that to create the full template. With the band saw I now have access to, I would make it out of cheap 1⁄8” material, allow me to cut it out with a hot soldering iron or hot knife. This would eliminate the need to seal the edges later, and I could have cranked out a couple and probably sold them (if the reaction to this tutorial is any judge of that.) My biggest mistake on this was not taking my time to make a good and symmetrical template.
It would also be useful to make a heat seal template that was 1⁄2” smaller all around. This would allow you to iron and press into the template and get a uniform seal (unlike my first failure.)
Sealing the Edge
I turned on my standard household iron and started sealing the bag. (It was happy to be used for a change. I love wash and wear fabrics and like to keep the iron on a shelf.) I had played with a few scrap pieces before I started and I recommend you do the same. The best setup I found was around 5 or 6 (my iron has 1-9) and moving a little slow. Be sure to practice the sock technique described below.
After the first sealing attempt, I test fit the guitar. I couldn’t have done it better if I actually DID know what I was doing. I noticed some less than satisfactory seals. Forcing open the inside with your hand allows you to see how far in the seal has taken. The orange arrow points out a section not sealed almost all the way out to the edge. A good bit of this is because of the twisting that was required, because of the asymmetrical template. Taking time on the template construction or flipping over the template when cutting out these pieces will eliminate some of this. You are shooting for about a 1⁄2” of seal or better.


I had some problems getting the wrinkles to seal. The ironing board cover I was using is too soft and it didn’t hold the bottom sufficiently. I worked slowly over the entire edge and did the best I could.
After I thought that bag was sealed perfectly, wanted to test it. How do you measure how much water gets into a bag holding something? That is pretty hard to do. But you can test how well it holds water. I took it to the bathroom and filled it with water. If it is can hold in water it should keep water out, right? As you can see, I had a problem. My haphazard method of sealing the edges needed some improvement. I hung up the bag to dry out and try again at the sealing.
Back to the drawing board. There were two problems with my method of sealing. First, I couldn’t rub down the edge behind the iron, because the heat seal coating really retained heat and it burned my fingers. Solution: I just put a sock on my hand and rubbed directly behind the iron. Second, my ironing board is too soft and the bottom fabric isn’t forced up against the top to heat up its sealing material. Solution: I used a large piece of standard corrugated cardboard under the bag when ironing.
I should also note that it is a good idea to do some tack seals. By that I mean do something similar to what welders do with tack welds. Lay the bag out and use the iron to seal small sections every couple inches. This keeps the edges from going out of alignment when you run the full “weld” down the edge. It was at this point I realized how skewed my bag was from making a bad template.


Before doing the second sealing, I put in the guitar and trimmed the bag length down. You want to have enough length to be able to roll up the end three of four times and then make the ends touch. The bag will close like the first picture at the top of this page. It is safer to leave the bag a little longer.
After completing a better seal, the bag was water tight. If I ran out of water bags, this would work in a pinch. I trimmed off where the two sides didn’t match up. This is yet another reason to take time on a good template. If you were perfect in cutting out and lining up your side, you can skip this part. That is an easier method by far, as it is much easier to judge the true seam width if both sides are lined up before sealing. The sizable pile of scraps when I finished up was a testimony to how poorly I did. Time to dry out the bag again.
Attaching the Clips
While the bag dried, I cut webbing pieces for attaching the clips to the bag. With a low temperature soldering iron, I slightly melted the edges of the webbing to keep it from unraveling after the cut.
To attach, you just fold the webbing around the top edge of the dry bag and sew a zigzag stitch forward and backwards a few times. I tested out the setting with a spare piece of webbing and on of the dry bag section I had cut off. You need to get the length close., as your seam should be sew over the location where the bag is already sealed.
If you sew into the unsealed area, you reduce the opening size in the bag and introduce many pin holes where the bag can leak. This isn’t a large factor in the water tightness of the bag, because of the multiple rolls. However, I believe that having edges of a zig-zag stitch on the inside would be more likely to tear out than the uniform sealed edge. This is a place that will be stress each time the bag is open. It is safest to just keep the seam over the sealed region.
With both clips sew on, I am now finished. To use the bag, you just put the guitar in, roll down the top and clip the clips together. One thing I noticed when sewing the webbing on is the tendency for the bottom piece to walk, when the feet try to move the material. Start the first full section of stitches by hand to avoid this.


I cut the bag for length before the second sealing. Didn’t try to fit it after the second sealing until after I sewed on the buckles. I was so concerned with water tightness that I sealed in almost an inch, instead of the 1⁄2” that I originally wanted. This created a serious problem, as my guitar will no longer slide in the bag all the way. I sealed it really good this time, so it doesn’t want to come apart.
Whoops! I knew this first one wasn’t going to be pretty, but I assumed it would work. That is why I bought 2 yards. I have used less than a 1⁄2 yard so far and this first attempt can be turned into a waterproof cell phone case.
Post Script
This article was written a few years ago. I wound up not taking the Backpacker guitar with me on my bike tour. I also no longer own this guitar or bag. This shouldn’t keep you from making your own, however. The one problem with this bag is the possibility of puncturing the bottom, there the neck inserts. Cut off strings are very sharp. My solution for this was to get a very thick wool sock that fit over the tuners. This did two things, first it protected the water proof integrity of the bag. This sock also protected the exposed tuners, a second unintended consequence. Good luck if you take on this project. With a little work, you can have a nice dry bag for any custom application that should last a long time.